SINEplayer Quick Start
After adding instruments (either from MyLicenses, or from existing downloads you did earlier – see the Installation Guide for details), your instruments with all their mic positions will show up in the Library View.
Library View
This is where you load all instruments and articulations from. Click “Browse” in any collection tile to see the downloaded instruments from that collection. When you click on an instrument, its articulations will be shown. You can load a whole instrument by double-clicking it or dragging it into the Articulation List; same with individual articulations.

Articulation List
Each instrument by default will be loaded on its own MIDI channel. You can add new articulations from the same instruments by dragging them from the Library View.

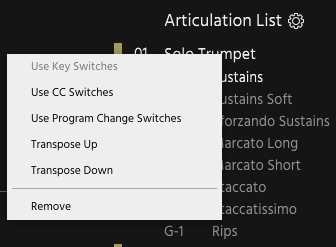
Right-clicking any instrument lets you remap the instrument to use CC Switches or Program Changes, or back to using Keyswitches. You can transpose the instrument, as well as remove it from the Articulation List.
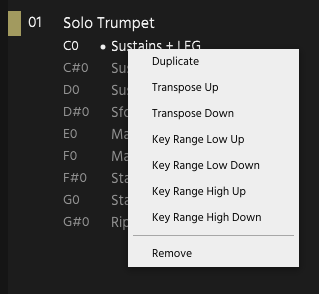
Right-clicking any articulation within an instrument lets you duplicate it (for example if you want different legato settings for the same base articulation), adjust its Key Range, and remove it from the Articulation List.
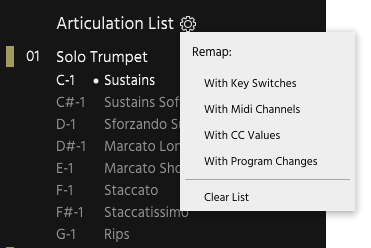
By clicking on the cog wheel, the Articulation List context menu lets you globally remap all loaded instruments to Key Switches, MIDI Channels, MIDI CC Values (the used CC is defined in the Options View as “Articulation Switch” in the Controller Map) or Program Changes. Here you can also clear the whole Articulation List.
Playing Articulations and Articulation Options

At any given time, only one articulation from each instrument is the active one (unless you are using PolyMode – more about that later). You can recognize the active articulation by its brighter color in the Articulation List.
Every articulation has a number of options which you can change in the Articulation Options panel at the bottom right. Only one articulation across all loaded instruments can be edited at a time. You can recognize the editable articulation by a little dot to the left of its name. Click an articulation with the mouse to edit its Articulation Options. Note that this selection does not follow Key Switches or other selection methods by design – only the articulation with the dot is influenced by the Articulation Options.
The Mixer View – changing microphone positions
By default, every instrument/articulation loads with the default mic setup for that instrument. To add or remove mic positions, go to the Mixer View. Each instrument can be unfolded to show its mic positions. Click the toggle button at the top of a channel to enable/disable that position. The channel strip controls (fader, solo, mute, pan...) work the same way like on a mixing desk. At the very bottom, you can set the output of each mic position.

If you have multiple instruments loaded and want to adjust mic positions for all of them at the same time, click Mic Remote in the bottom left. Every change you make to a position here will apply to that mic position across all loaded instruments.

If you have found a mic combination you particularly like, click the Merge button in the instrument channel. This will merge the current mic mix down to a single stereo mix, which you can then use like any other mic position.

Performance View
The Performance View lets you control particular articulation parameters like Variations (for example different vibrato styles) or Tempo-sync options. These are shown on the left of the Performance View when needed by an articulation.
Here you also find all loaded articulations for the current instrument shown in the Articulation Grid.

Performance Articulations lets you switch and morph between stacks of articulations on the fly while playing. Create a new Performance Articulation via the button in the Articulation List, then drag articulation from the list, or even the Library into it. You can adjust the ranges withing the stack by dragging the borders around; drag the name of a section to move it within the stack.
A Performance Articulation can switch or crossfade between selected articulations via the Switch / XFade buttons.
Next to it, the Velocity and CC buttons determine, whether the switching/XFade will be done by a MIDI CC (definable in the Options View’s Controller Map as "Performance Articulation CC") or by keyboard velocity.

Saving/Loading Presets
If you have set up an instance of SINEplayer however you like it, you can save the state by choosing Save from the top of the window. Here you can also load a saved state by choosing Load.
